WUSB54G ANTENNA MODIFICATION
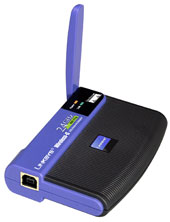
1. The Card before modification and after modification


ATTENTION!
MODIFY THE CARD AND REMOVE THE GUARANTEE SEAL, YOU WILL LOOSE YOUR GUARANTEE OF THE PRODUCT. SO MAKE IT WITH YOUR OWN RISK
2. Why we choose USB type? - It's quiet handy.
- We can make it to travel
- Easy to use
- Do not need to open the case to make instalation, just plug and play
- So many product to choose
- Not too expensive
3. Why we choose WUSB54G v.4 - It's not to small to modify and its uses Ralink2570 chipset, this Card driver Linux compatible.
- Because so many USB Card type that not available with Linux driver or not been ready yet .
- Remember just only version 4 uses a Ralink Chips
4. The Driver - There are two drivers available: rt2570 is the stable version
- while rt2x00 is the development version based on the new devicescape stack.
- The driver you can download both at http://rt2x00.serialmonkey.com
- The driver both to work, but less problems with the stable one.
5. Monitoring/Kismet - If your are playing with monitoring (kismet, airodump, etc.) or injecting packets (aireplay), you should check out the CVS version of the stable driver or a specially patched one at http://http://homepages.tu-darmstadt.de/~p_larbig/wlan/. These can inject packets and show the signal strength.
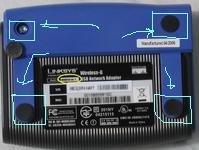
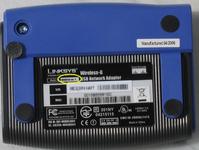
6. STEP BY STEP MODIFICATION - WUSB54G ver.4, you can take a look to the bottom of the card version tag maked yellow in the picture. So check the product before you buy the card.
7. OPEN THE CHASE - To open the chase, the first you have to open the screw under the rubber pad bellow the antenna ( marked blue ). After that you can carefully open the case.

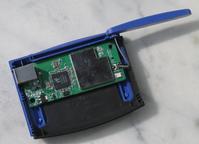
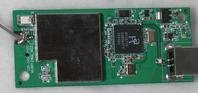
8. THE CARD OPEN - After you open the chase you can see all of the parts.
- Take a look soldered of the original antenna, this is will be modification, to make eksternal antenna.

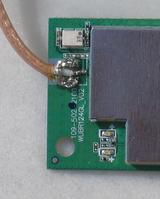
9. DESOLDERED THE ANTENNA - And then de soldered the original antenna using soldering iron and a de soldering pump.
10. BE CAREFULL - Be carefull not to overhead the board or accidently create a connection between the antenna ground and and the small-SMD-capasitor as above.

11. TAKE A RP-SMA PIGTAIL - Take a common RP-SMA pigtail or pigtail you want to use, and soldering the cable, the shielding to the ground and the core to the small pad next to shielded chip.
12. DRILL THE CHASE - In this case we can't re-use the hole of the original antenna, so we must drill the chase to make a hole. Be carefull when drill the chase.

13. COMPLETE - After finish all, then close the chase. And the modification of the external antenna is done.
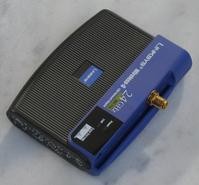
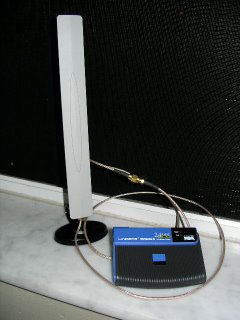
14. ALL DONE - You can attach with the antenna that you want.

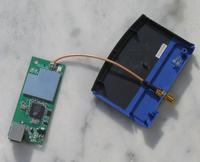
15. OR - Maybe if you dont want to drill the chase, you can make the pigtail like this. So you can use the original hole of the antenna.
source : from linux forum, re-write by me. any suggest for my web or the article? |